Google Cloud Platform Data Engineering Instructor with ROI Training now residing in Colorado with the wife of my youth (31 years). Besides tech, I enjoy aviation and landscape photography.
BigQuery’s INFORMATION_SCHEMA views provide a ton of useful information about BQ usage. A simple query will let you see the total size of each table in a dataset and you can use the ROLLUP() operator to compute a grand total for the whole dataset:
SELECT
  table_id,
  -- Convert bytes to GB.
  sum(ROUND(size_bytes/pow(10,12),2)) as size_tb,
  sum(ROUND(row_count/pow(10,9),2)) as billion_rows
FROM
  -- Replace bigquery-public-data.wikipedia with your own dataset:
  `bigquery-public-data.wikipedia.__TABLES__`
WHERE table_id LIKE 'pageviews%'
GROUP BY ROLLUP(table_id)
ORDER BY table_id;
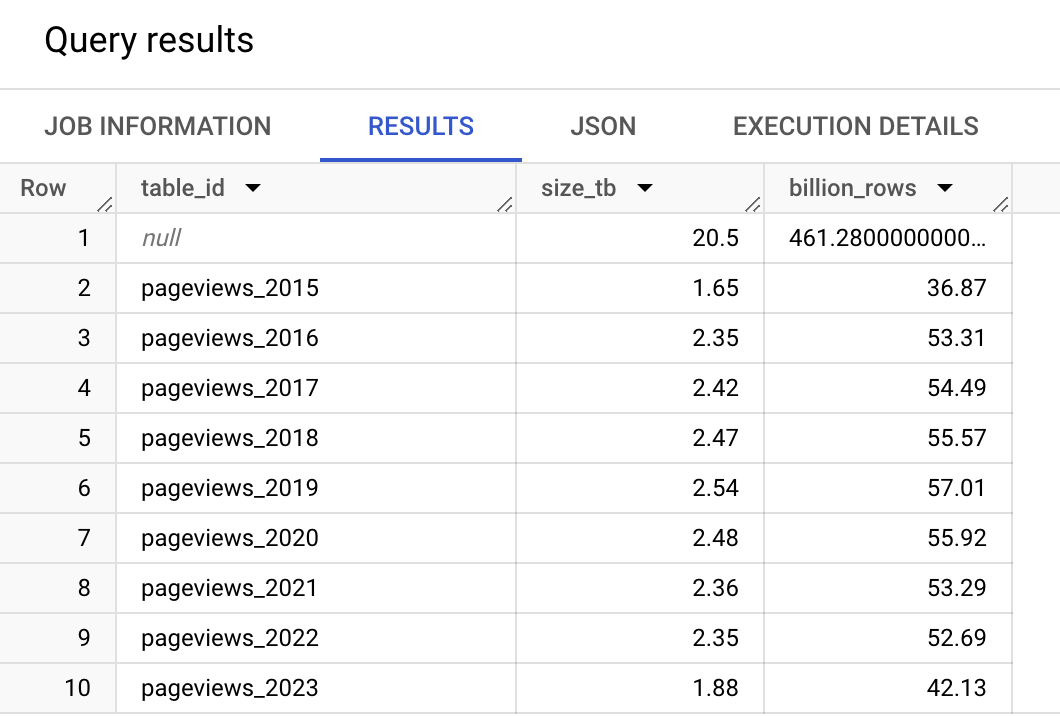
The query above shows the total size of all the pageviews tables in the wikipedia public dataset. At the time of this writing, these are the results. The first row is the grand total computed by the ROLLUP() function.
Querying all the pageviews tables with a wildcard operator would ingest 20TB and almost half a trillion rows! Be careful where you do that as it might cost you ~$100, but running the INFORMATION_SCHEMA query above is free as it only queries metadata.
One of the most common questions I’m asked when teaching Data Engineering on Google Cloud Platform is how to find out how many slots BigQuery used to run a query. While there is no direct measurement available on a per query basis, the INFORMATION_SCHEMA table documentation provides a way to estimate the number of slots used. You simply divide the total slot time, which is the time the query ran across all workers, by the elapsed time of the query. The query below will show the estimated number of slots for the 10 most recent queries. Alternatively, you can put a BigQuery job ID in the WHERE clause to see the data for a specific query. Obtain the job ID from the Job Information tab in the results or from a log entry in the Cloud Logs Explorer.
# Avg slots per query
# See https://cloud.google.com/bigquery/docs/information-schema-jobs#estimate_slot_usage_and_cost_for_queries
SELECT query, job_id, start_time,
-- Average slot utilization per job is calculated by dividing total_slot_ms by the millisecond duration of the job
SAFE_DIVIDE(job.total_slot_ms,(TIMESTAMP_DIFF(job.end_time, job.start_time, MILLISECOND))) AS job_avg_slots,
user_email,
ROUND(total_bytes_processed / POW(10,9), 2) AS gb_processed,
total_slot_ms, reservation_id
FROM `region-us`.INFORMATION_SCHEMA.JOBS_BY_PROJECT job
-- WHERE job_id = "your_job_id"
ORDER BY gb_processed DESC
LIMIT 10
Here are some sample results:
Note that the BigQuery Admin console as well as the Cloud Monitoring section of the cloud console will show the number of queries in flight and slot utilization across your entire organization. However, when you’re just dying to know how many slots an individual query probably used, the above query will do the trick.
…your Smart TV. I recently bought a digital photo frame only to discover that the app (Frameo) only allows you to send 10 photos at a time. Yuck, returned it.
Then I bought a Google Nest Home Hub Max, which is a really sweet device. It has great sound including bass (which you can tweak via Settings in the Google Home app), home control on screen as well as via Google Assistant (voice), a built-in camera which can be used as a Nest security cam or for video calling with Google or Zoom, the ability to play various music services, YouTube videos or Nextflix, and even cast to a Roku or Chromecast (Android TV). But I mainly bought it as a digital photo frame. Whenever you’re not interacting with it, Max cycles through your selected Google Photos album. You can create and choose a “live album” like Friends and Family, which automatically shows new photos containing the faces you’ve selected. And the photo show goes on while playing music in the background. My wife can now finally see all the photos of our kids we’ve been taking for the last 20 years… AND turn off the lights in Google Home without having me around.
I definitely plan to keep the Max. It’s a beautiful device with a lot of useful features. But after I set it up, I realized that with respect to photos, I could have done the same thing with the Sony Android TV already in my living room, which for the last year has been displaying beautiful, curated nature photos from around the world (the default setting). I forgot that once you add the TV (or Chromecast device) to the Google Home app, you can select an album to display in “ambient mode”, including a live album. Now that I think about it, I’m just guessing that devices from Apple TV and Amazon Fire TV Stick have the same capability, which might explain why the dedicated photo frame apps are so limited in functionality. The market has moved on, and I’m just now getting the message 🙂
Chrome m83 includes a new feature to block third-party cookies by default in Incognito windows (https://venturebeat.com/2020/05/19/google-chrome-83/). This is no doubt a good thing for browser security; however, it’s a problem for some apps like bigquerygeoviz that may rely on services from other domains (in this case, bigquerygeoviz is hosted at appspot.com but is making API calls to google.com). Only workaround for now is to turn the setting off when you launch an incognito window, like this:
Many technical trainers like myself use incognito windows for demos and keeping numerous credentials separate, so we may have to get used to changing this setting for a while.
Google Cloud has extended several free training offers for May, including another 30 free days of Qwiklabs. We use Qwiklabs in all the courses that I teach. They are an excellent way to get hands on with Google Cloud Platform, and Google has made the entire self-paced labs catalog (over 400 labs) available for free this May. If you have some time for learning new things this month, I strongly encourage you to take advantage of this offer!
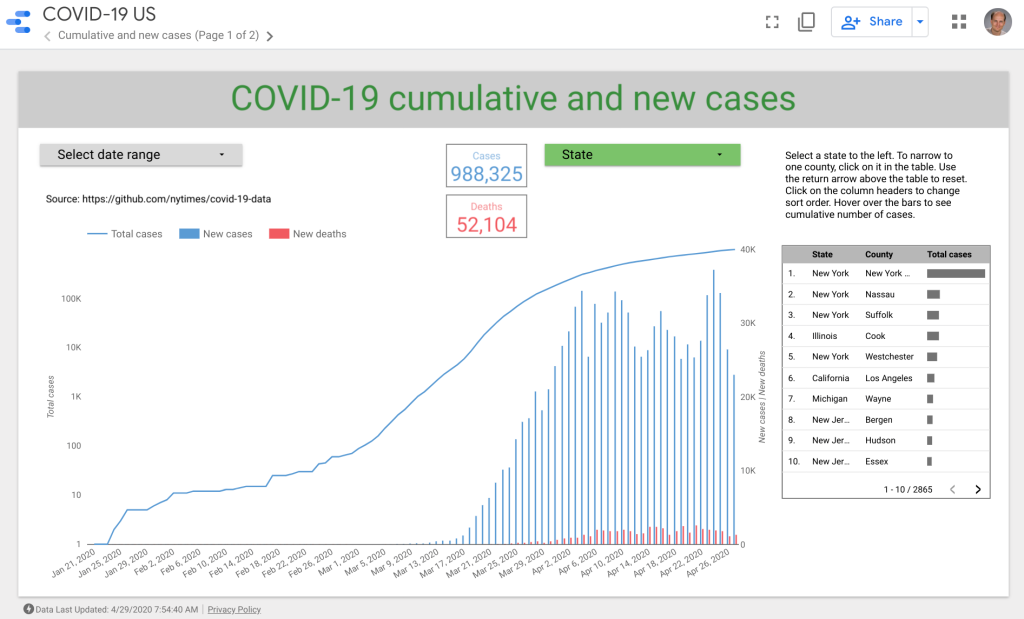
I’ve created a pipeline and dashboard using Google BigQuery and related tools (GeoViz and DataStudio) to daily import the NYT dataset for each county. This pipeline and dashboard cost literally less than a penny per month to operate in Google Cloud. You can find complete instructions in the GoogleCloudPlatform github repo, or just link directly to my COVID-19 US dashboard to explore the data.
I’ve used bigquerygeoviz and the county by county dataset from NYT to create a map of coronavirus in the US as of Apr 13 adjusted for population (cases per million county residents publicly available in Google BigQuery).
COVID-19 cases per million residents in US counties
Because it’s adjusted for population, it lets us see some interesting things:
NYC and Louisiana are hit hard, as we know.
Los Angeles and Miami, despite having a large number of cases, are actually not hot spots when considering the population.
A couple Colorado mountain counties with relatively small year round population have a large number of cases due to the ski resorts (now shut down). Ditto for Blaine, Idaho, near Sun Valley ski resort, which hosted a large wedding from Seattle in February before anyone realized the risk.
But what’s going on in Albany, GA, with more cases per person even than congested Atlanta? According to a WSJ article, health authorities trace it back to a funeral in early March. However, the article also notes that Albany, GA is home to P&G’s second largest plant making, you guessed it, toilet paper. The folks in Albany have had to ramp up production 20% even while every day learning that someone nearby has fallen ill or died of COVID-19. “Mr. Patterson, the P&G plant veteran, said the hardest thing is having to maintain distance from friends and family who are struggling.”
Am I suggesting that hoarding toilet paper caused the outbreak in Albany, GA? No! And as the WSJ notes, people ARE consuming more toilet paper at home (vs. work, which typically uses a different grade of TP) so some of the increase in demand is legitimate. Ditto for groceries, demand for which is up 2x in NYC according to another recent WSJ story. But I think it does illustrate that there are real people whose real lives and families are on the line while they keep working so we can have nice things. Healthcare workers (bless you all!), grocery store stockers, delivery people, and yes, even toilet paper makers, are risking their health every day for all of our sakes.
Disclaimer 1: These opinions are my own, not those of my employer. As a technical trainer for Google Cloud Platform, I have taught both in-person and virtual classes for years and wish to offer my experience.
Disclaimer 2: Sorry this is so late. Much of the equipment I recommend is probably out of stock for the same reason that you are likely reading this post now.
TL;DR
Turn on your camera, especially when starting class.
Have students mute themselves unless they’re speaking.
Present one window at a time or a second screen in lower resolution.
Use chat and quiz tools to engage students!
Join the meeting with a tablet to share drawings.
You can record your live class and share it with students after.
Keep it live. No webinars!
Lots of folks are working and learning from home these days, so I’m offering a few pointers and best practices to help your calls run smoother and more efficiently, ranging from etiquette to equipment to tips for popular software (Zoom and Google Hangouts Meet, which is free for schools through July 1, 2020). Hangouts is 100% Web-based so you can run it on any operating system, including Android and iPhone applications. Zoom requires a download for Mac, Windows, and Linux, but can also run on Android and iOS as well as a Web browser so it works fine on ChromeOS, too. Zoom has extra tools designed specifically for virtual classrooms.
Etiquette
First things first, students: always mute your microphone if you are not speaking. No one needs to hear your dog barking or your baby brother crying. Even if you have no background noise, any unmuted microphone can produce echo for everyone on the call, even with a headset. Here’s how to mute yourself:
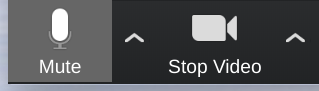
In Zoom, click the microphone button in the lower left corner or press Alt+A. To mute your video (turn off your camera), use the Stop Video button or press Alt+V on the keyboard.
In Hangouts, mouse over the bottom part of the window and click the microphone that appears on the left. Or click anywhere in the window and press Ctrl+D. To mute your camera, use the icon on the right or press Ctrl+E. Don’t click the red button in the middle. It looks attractive, but it will end your call.
Should you leave your camera on? The teacher decides. As a technical trainer myself, I like to see a few faces in order to help make that personal classroom connection instead of talking to my screen. For the same reason, I always leave my own camera on when presenting. However, video does take up more Internet bandwidth for everyone, so you may need to turn your camera off. As a teacher, I often ask everyone to turn ON their camera when first joining the call or when asking live questions.
Tips for teachers
In Zoom, there is a Mute All button on the participants panel. Use this to turn off everyone’s microphone at once. Or press Alt+M.
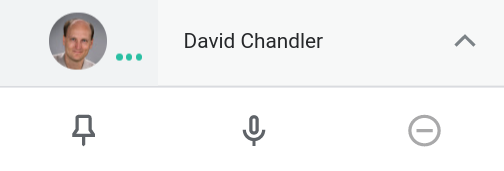
Hangouts doesn’t have a Mute All button, but any participant can mute any other, so you can ask students to help out by muting anyone who is making noise while you’re teaching. Click the People panel in the upper right to see who is making noise.
This shows that I am muted. If the red microphone doesn’t appear for a participant who is making noise, use the drop-down arrow to the right of their name, then click the mute microphone button in the middle. Again, any participant can mute any other, but only participants can UNmute themselves, so they might be surprised if they want to talk later and find that someone has muted them. You might want to ask everyone to practice muting and unmuting on the first call so there are fewer surprises and delays later on.
Screen sharing
Using Zoom or Hangouts, anyone can share their screen with all participants. Here’s how:
In Zoom, click the Share screen button at the bottom of the window.
You can then choose to share your whole desktop or only one application (window).
See notes below on which to choose.
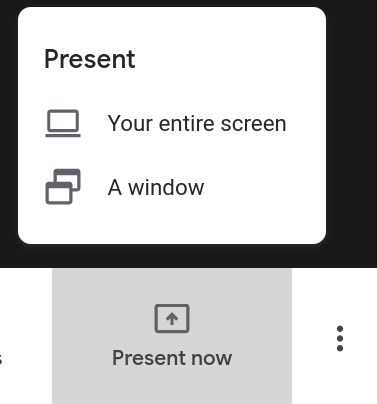
In Hangouts, mouse over the lower right of the window. The Present Now button appears.
You can then choose to present a whole screen or just one window.
If you have one screen, I recommend to share only a window for a couple reasons:
It’s more polished. Students don’t need to see everything on your screen, and it gives you the freedom to move the window and use other windows on your screen without changing their view at all. I try to keep everything that I want to present in a separate window for this purpose. In Chrome, you can use Ctrl+N to open a new browser window. Do this ahead of time and load your content, then present only that window.
It saves bandwidth. A window has fewer pixels than your entire screen. I use a Chrome extension called Window Resizer to set my shared browser window size to 1440×900. That way, students with a full HD screen can see my whole browser window without shrinkage and still see the side panels like People and Chat for the call.
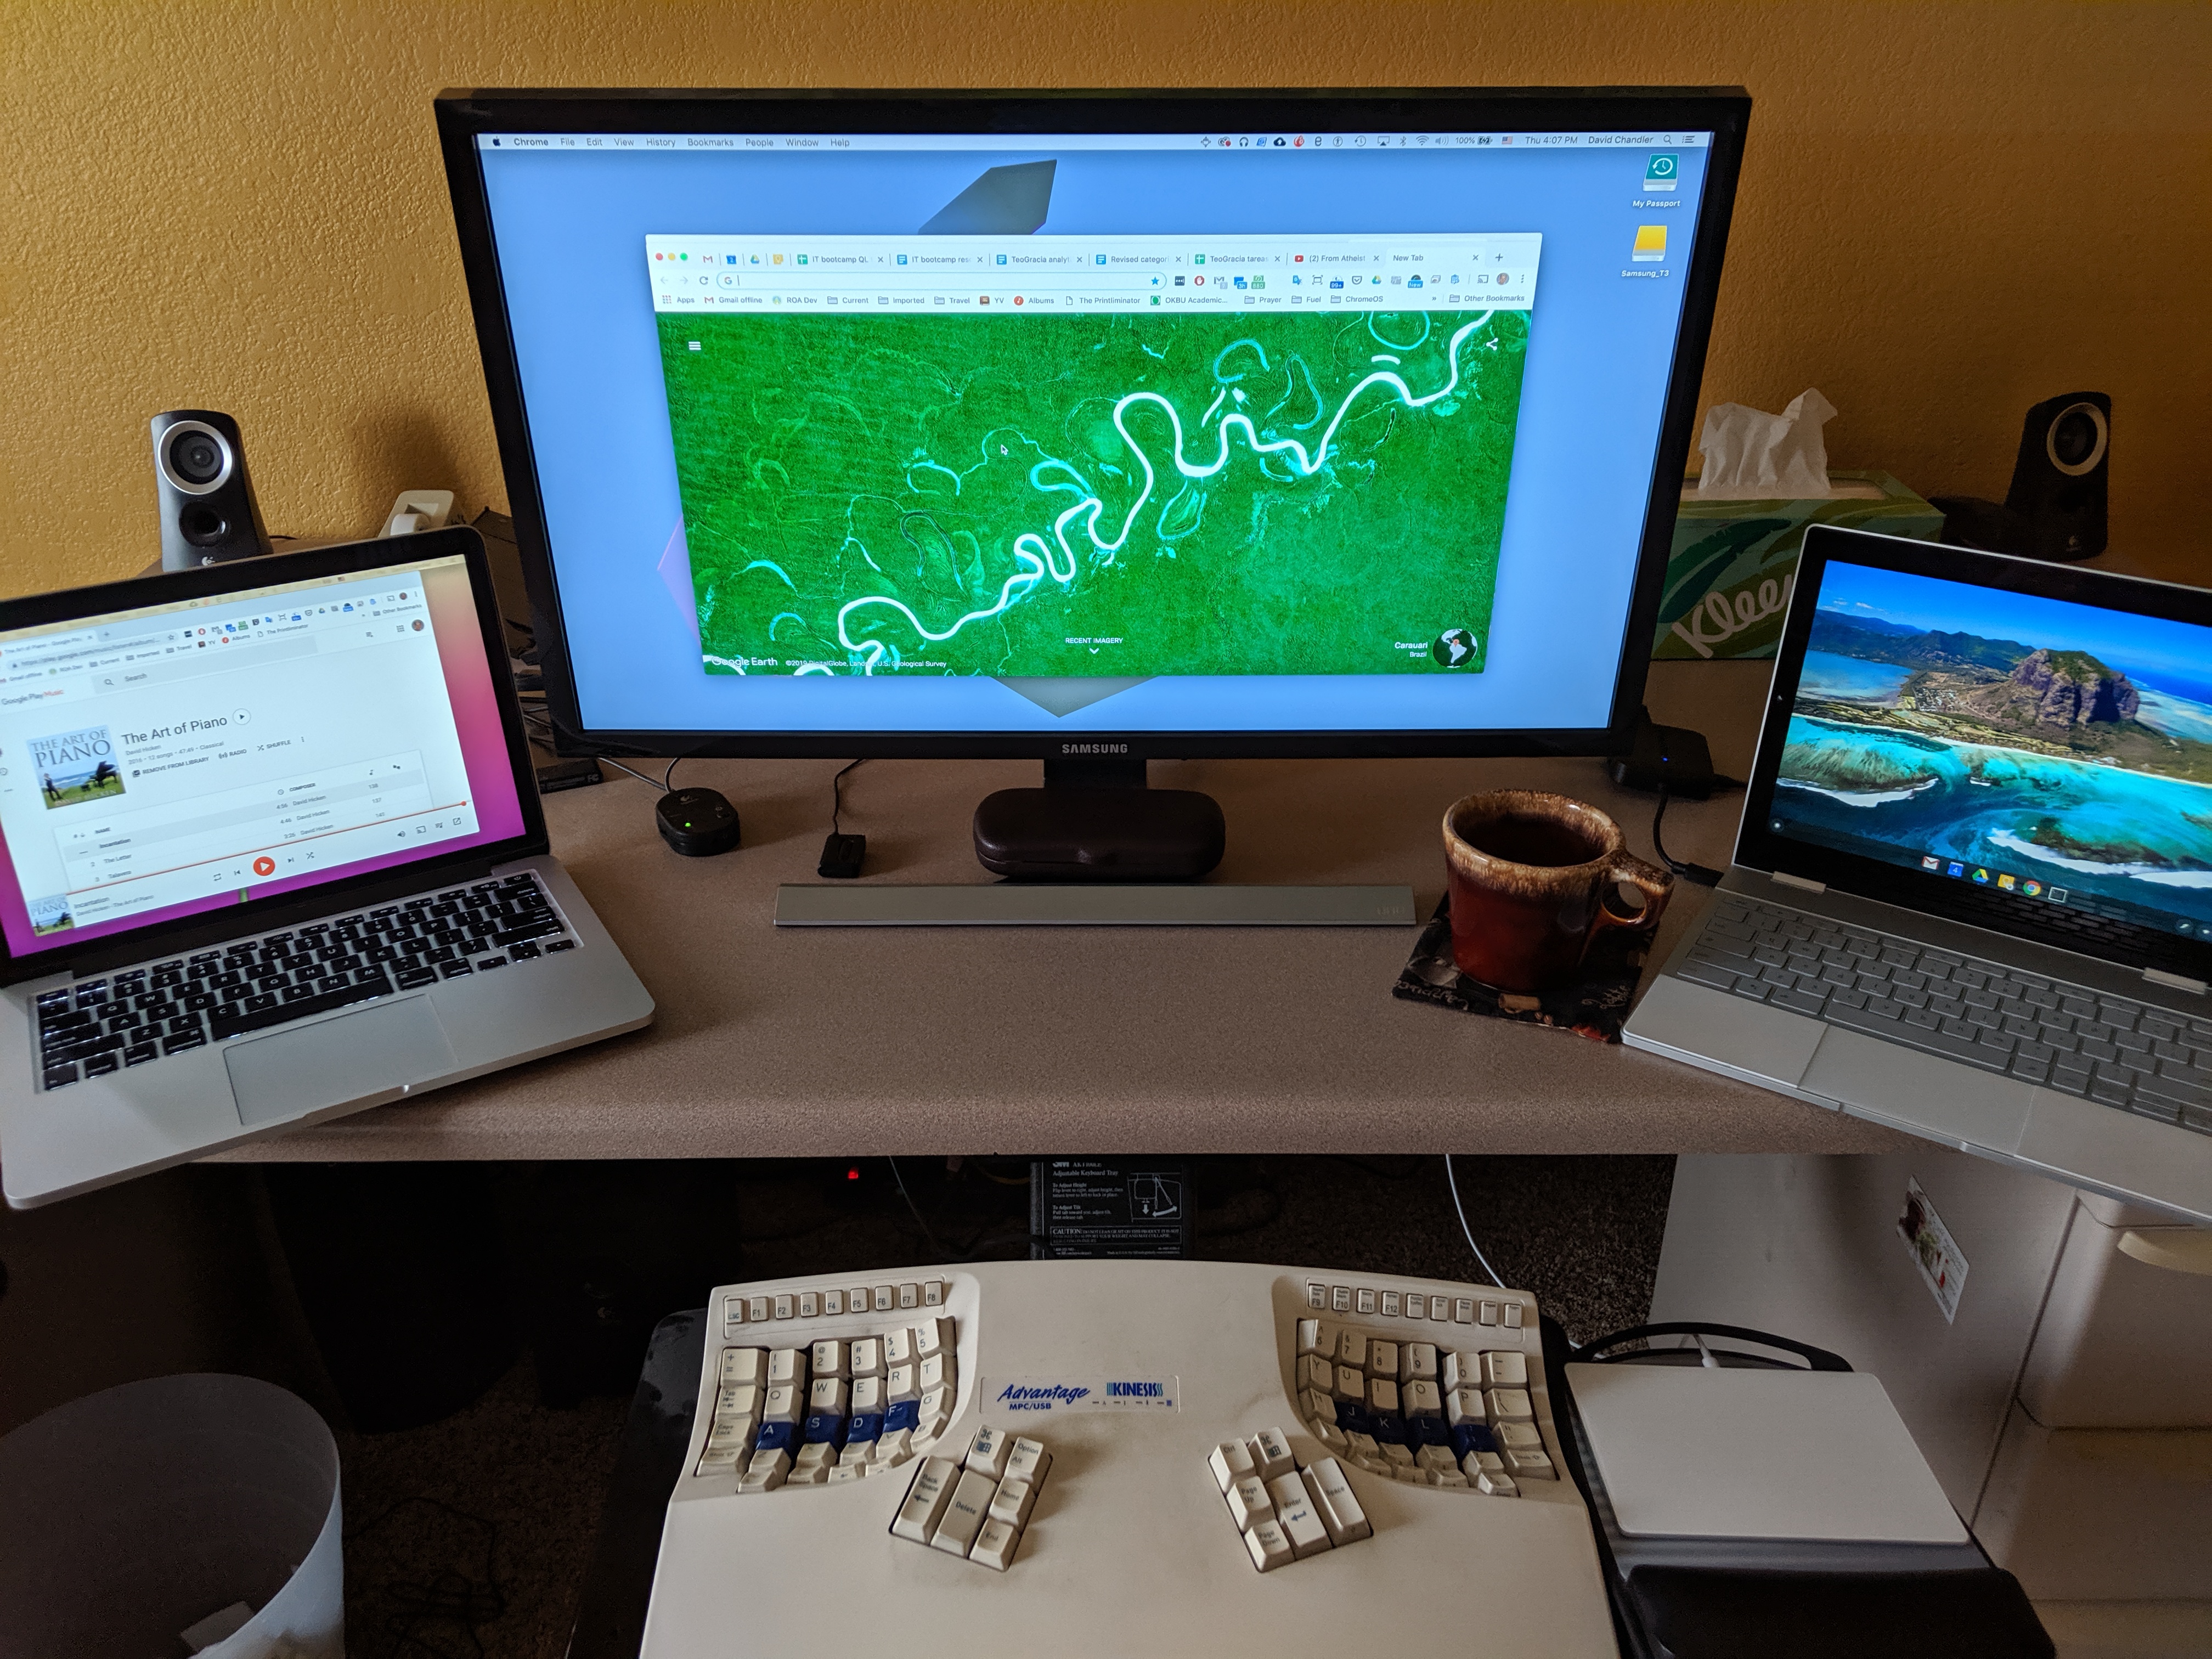
If you have two screens, you can present your entire second screen for the most polished look. This way, you can put your windows in full screen mode so students won’t see any window trim, bookmarks, etc. To share something new, simply open it on your main screen, then drag it over to your second screen to share it with others.
Pro tips for presenters
If you’re using a second screen, set the video resolution on the screen you are going to present to HD resolution (1280×720) or something close to it. This saves network bandwidth and ensures that your content will fit on students’ screens, as well. You can set display resolution in your operating system’s control panel.
On MacOS, when presenting your entire screen, use multiple desktop workspaces and the four-finger swipe gesture to switch between them. This lets you easily switch between different types of content like a full-screen presentation in Google Slides and a separate browser window for demos.
In ChromeOS, swipe down with three fingers to seamlessly choose another window to present.
Recording
Both Zoom and Hangouts Meet allow you to record meetings. As long as your account administrator allows it, you’ll see a record button or menu option to start recording. After you close the meeting, you’ll get an email with a link to the recording that you can share with students. The recording captures just what any student sees: audio and video (including unmuted students), and the screen you present. This is an easy way to share each class with any students who may have missed it, and is in fact one of the great benefits of virtual classes.
Equipment
Internet connection
To watch a video call, you really need only 2-3 megabits per second (Mbps) download speed and upload speed doesn’t matter. However, to present, you need at least 2Mbps upload speed, and 5Mbps is recommended to send HD quality video without noticeable lag. Many DSL (phone company) connections cannot offer even 2Mbps upload speed, and even then the video you transmit will be a little choppy. Cable services typically do offer at least 2Mbps upload. If you’re presenting only slides with audio (no camera), you can get by with 2Mbps upload, but for a face-to-face meeting with minimum lag, you’ll want more upload bandwidth.
Audio
In order to maintain the best audio quality for everyone, an excellent and reasonably priced (~$25) option is a wired USB headset with built-in microphone. I have used the Logitech H340 for years and can wear it comfortably all day if necessary, though I prefer not to be chained to my desk that way. Wireless (Bluetooth) headsets are also an option for shorter calls, but the batteries typically don’t last for a whole day of teaching.
Alternatively, you can use a standalone USB microphone, but beware that the microphone should be somewhat directional and not pointing at your speakers or you will create echo and possibly even screeching feedback on the call. I’ve had very good success with the ~$50 Blue Snowball mic. There are more expensive options, but in my opinion, you don’t need to spend a penny more on conference calls unless you’re trying to record broadcast quality. On many laptops, the built-in microphone quality is actually fine.
Video
Your built-in Webcam is fine. Most videoconferencing systems only transmit video at 720 pixels resolution max, so there is no need for a full HD webcam. If your computer doesn’t have a webcam, any USB webcam will do. I use a pretty old Logitech C615 which cost me less than $35. It has a clever mounting system that lets it sit atop practically any screen.
Computer
Videoconferencing software can tax your computer’s processor, so the beefier the better. As a student, even the cheapest Celeron processor will be fine, but for presenters, a more powerful processor is recommended. Otherwise, if you are sending video and sharing your screen, your computer may feel a little sluggish. I’ve presented via Google Hangouts with a 2015 MacBook Pro dual core i7 and my browser demos were super sluggish. With a 2019 Acer Chromebox having a quad-core i7 and 16GB RAM, I have no delays at all. My sense is that Zoom is easier on most CPUs than Google Hangouts.
Tools for teachers
Chat
Zoom and Hangouts both offer a chat panel where anyone can post to everyone in the call. In addition to the group chat, Zoom also allows students to communicate privately with the teacher and vice versa, which is often handy to preserve privacy of questions.
The chat panel is an easy and useful way to engage students. You can ask questions as well as encourage students to ask questions in chat. Here are a few ways to use chat effectively:
I encourage students to ask questions in chat while I’m presenting, which is a great way for them to take note of something without interrupting. When I’m feeling game, I answer questions right away in the audio channel; otherwise, I wait until I’m finished presenting a section and then address questions.
The chat panel is a great place to post Web links to related materials like a class document.
Any time we take a break or are working on an activity, I post what we’re doing and when we’ll resume for students who may have stepped away for a minute.
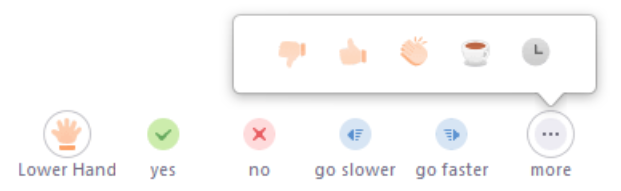
Nonverbal tools
Zoom offers some great nonverbal tools for teaching. Students can raise a hand, answer yes/no, indicate they’ve stepped away for a moment, etc. You could ask, “Is everyone ready to move on?” and ask for a thumbs up/down, then see at a glance who’s ready (or whether anyone is paying attention!)
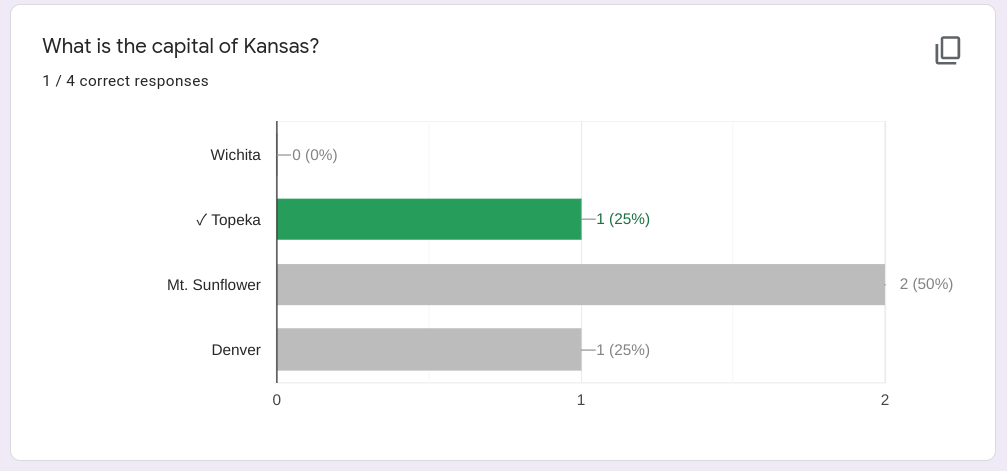
Quizzing students is a great way to engage students in virtual classes. My favorite tool is Google Forms, which is free with any Google account. To get started, find a tutorial online or use the official guide from Google. There is a Blank Quiz template which makes it easy. You can create a multiple choice or short answer quiz, then click the Send button to create a link that you share with students by posting it in chat. Students instantly see their score and the quiz creator can see all individual answers as well as a helpful summary grouped by question. I like to present the summary to students on the virtual call to foster further discussion.
You can use Google Forms for graded quizzes, too. Don’t forget to include a field on the quiz for the student’s name. The easiest way to reuse a graded quiz is simply to make a copy for each class. Choose the three dots menu next to the Send button, then “Make a copy.” You’ll have to generate a new link for each copy using the Send button, but this way the answers and scores for each class will be kept separately.
If you don’t need to keep grades and want to reuse the quiz for each class, just click the three dots menu in the upper right, then select Delete all responses.
Zoom offers a built-in polling tool; however, you have to (re)create the poll in every call, whereas Google Forms are reusable and provide a richer summary, so that is my tool of choice for online quizzing.
Drawing / annotation
Math teachers, this section is for you! If you don’t have access to a tablet (or even if you do!), Desmos is a fantastic tool for graphing equations that will do all the drawing for you. With a tablet, you can easily share your own drawing or other handwriting with your students. All you need is a stylus and your favorite drawing app. You can host the call on your primary computer, then install the Zoom or Hangouts app on your tablet to join the call on your tablet also. Remember to mute the microphone on your tablet AND turn the tablet volume all the way down so you don’t get feedback between it and your main computer. Zoom and Hangouts both support Android devices and i-things. Draw in your favorite app and share the app window or your whole tablet screen using the Zoom or Hangouts app just like you do on your desktop.
For tablets, I’m a big fan of the ~ $300 Chromebook flip tablets like the ones I’ve written about previously. They run Android apps in addition to Chrome apps, so you have a wide choice of drawing tools like Google Drawings, Jamboard, Squid, and others. I’m told the default Notes app works great on iPads.
There are many options to annotate slides or Web pages, as well. Zoom lets you draw over any screen you are presenting. If you’re using Hangouts, you can save a PDF of your slides or Web pages and then open the PDF in an annotation tool and present that window. Chromebook flip tablets have a built-in PDF viewer with drawing tools, or you can opt for more sophisticated tools in an app like Xodo, which is my personal favorite. With Xodo and a stylus, you can enable a smart mode where you use your finger to advance the page and the stylus to draw on the page. It’s really smooth.
Class documents / resources
Google Docs is a convenient way to share a syllabus, FAQ, or other lists of resources with your class. If your school already uses GSuite for Education, it’s easy. Just create a Google Doc, then click the Share button and “Get shareable link”. You can paste the link into a group chat or email to share it with students. If your school doesn’t use GSuite for Education, you can still use Google Docs effectively. Create a doc in your personal Google (Gmail) account, then click the Share button and “Get shareable link” and copy it to your clipboard. The link contains a random identifier so that only people with the link will be able to view your document. To provide the link to students in a virtual class, simply paste it into the chat panel.
Google Classroom is another great tool for sharing resources and assignments for the duration of a class (as in a semester, not just one virtual session).
Parting thoughts
With a little practice, virtual teaching can be as rich or even richer than in-person classes. Your subtle sense of humor may not come through as well on video chat because the class isn’t as “live” with mics muted, but I find that in some environments, students are actually more likely to ask questions via chat than they are in-person. In addition, tools like quizzes allow the teacher to get a quick read on how everyone is doing, not just the few who answer questions in class.
In my own experience, it took a while to get used to virtual teaching. It’s still not my favorite; however, I welcome less travel and the opportunity to go for a bike ride at home before or after teaching. More importantly, virtual students who have never seen me teach in person have told me that my online classes have been among the best technical classes they’ve ever attended, so I’m encouraged that it is possible to deliver a high-quality learning experience online. Sometimes you have to present to your invisible friends. It might not feel like anyone is there, but if you regularly stop and ask for questions, there will surely be some. And if you’re a regular classroom teacher, go ahead and ask specific students for their input just like you would in class. That’s what microphones and cameras are for, and the technology works pretty well to create a sense of virtual presence.
One final tip: I start every online class with a slide that says “It’s a conversation, not a webinar.” I think it helps to let students know that you as the teacher are expecting an interactive class just like you would in person. If you welcome their questions, they are far more likely to engage.
Speaking of questions, I’m happy to answer any via the comments below.
It’s that time again! The Best Buy Black Friday ad once again has some spectacular deals on Chromebooks for all types of users.
My favorite this year is the new HP Chromebook 2-in-1 14″ i3 8GB, a new flip tablet with some of the beefiest specs of any Chromebook. At the Black Friday price of only $349 (reg. $599), it is hands down the best value on the market for moderate to power users. I purchased it on a preview sale and the only thing I don’t love is the weight. It comes in a little heavy at 3.7 lbs., but the 14″ full HD screen and excellent sale price more than make up for it IMHO. The backlit keyboard is a pleasure with lots of key travel and more mechanical feel. It has 2 USB-C ports and 1 USB-A port so you don’t need an adapter for your USB security key or external mouse. The trackpad is smooth and responsive, and the full HD screen, while not the brightest or most saturated in color, is sharp and adequate even under bright lights. It’s built solid, so there is no annoying give when you rest your hands on the keyboard. 8GB RAM is plenty generous for a Chromebook, and like most modern Chromebooks, it runs Android and Linux apps, as well.
A close second is the ASUS C434 flip tablet, which is similarly equipped. It has a thinner bezel than the HP but square edges, which I don’t prefer, and I don’t like the tablet fold as much. Costco now (Dec 6) has the ASUS on sale for $399 (reg. $549) with Core m3 (not as fast as the i3) and 4GB RAM (vs. 8GB for the HP). It’s a great price for a very nice machine, but not as good a value as the Black Friday price on the HP. The ASUS C433 (Best Buy exclusive) is about $40 cheaper than the ASUS C434, but feels a little less solid next to the trackpad.
On the lower end, the Lenovo 2-in-1 is a good value at the Black Friday price of $179. The Acer Spin 11 is a little bulkier, but offers more solid construction and performance. Its cousin, the Acer R11, has served our family very well for years. The Spin 11 features an upgraded processor (Celeron 3350), USB-C ports in addition to USB-A, generous battery life (10 hrs), and front/rear cameras for tablet mode. At the Black Friday (and beyond) price of $219, it is an excellent value. The very similar Lenovo C340 11.6″ 2-in-1 is in the Costco Black Friday ad for $229, also a great value. It feels more solid than its predecessor. The Lenovo’s N4000 processor is slightly (~30%) more performant than the Acer’s N3350, but the Acer is more symmetrical in tablet mode. Also the Lenovo, being a new model, has a couple years longer support from ChromeOS. The Lenovo screen is slightly brighter and crisper than the Acer.
For the most budget conscious, the Samsung 11.6″ 4GB model (not a flip tablet) at $119 is an excellent value. The rubberized case seems like it’s built to withstand some abuse, making it a good first machine for younger students.
To summarize, my top three Chromebooks under $350 this Black Friday are:
$349 HP Chromebook 14″ 2-in-1 8GB
$219 Acer Spin 11 4GB (Best Buy model with dual camera for tablet mode)
Last October, Chrome Unboxed reported that support for Apple’s Magic Trackpad 2 was in the Chrome dev channel. It’s now in Chrome stable as of v73, and I’ve verified it with several popular Chromebooks including the Acer R11, ASUS C302, and Pixelbook.
Works with KVM switches, too
Why would you want an external trackpad when Chromebooks already have pretty decent trackpads built-in? Answer: when you’re sharing an external keyboard and trackpad between two computers. The previous Magic Trackpad was Bluetooth- and Mac-only, and, like the current Magic Trackpad 2, can pair wirelessly with only one device at a time. This makes it impractical to switch between computers. The Magic Trackpad 2 introduces a great innovation–a cord! (who knew?)–that is ideal for KVM switches. The trackpad cord features a standard USB-A plug used by most KVM switches. The Magic Trackpad 2 automatically pairs via Bluetooth with my 2015 Macbook Pro and also works wired through an IOGear DisplayPort USB KVM switch with my Pixelbook. It’s smart enough to send movements over only one channel (wired or wireless) at a time.
Guess which one is my work computer?
Why Magic Trackpad 2?
Mice bother me. Literally, they hurt my shoulder until I started switching mouse hands every other day to distribute the bodily wear. I’ve had much less trouble since using a trackpad. Plus, gestures are cool, and the Magic Trackpad 2 supports the four-finger gestures on the Mac and three-finger gestures on ChromeOS. Pinch zoom works in both. The Magic Trackpad 2 is huge, allowing me to move the pointer all the way across two displays with one motion. And it offers a definite “click” throughout the entire surface, with an additional level of “force click” that can be configured on the Mac (but not ChromeOS). Of course, tap-to-click works fine, too.
Kudos to Apple and the Chrome team for making this integration possible! It’s an ergonomic delight.